

While everyone loves the idea of sporting a golden sun-kissed look in the summer months, it’s best to limit sun exposure and get your tan from a bottle instead. Of course, almost anyone who has ever used a bottle of self-tan has had a serious self-tan fail. It’s easy to make little mistakes here and there that result in messy, smudged, and blotchy tans that look anything but natural. But, with these at-home self-tanning tips, you’ll be able to avoid common tanning mistakes and keep your perfect summer glow.
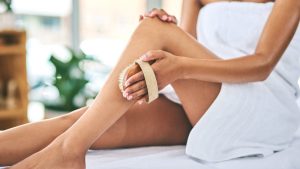
1. Prep the skin
The most crucial step that we often forget is to exfoliate the skin before applying tanning product. Getting rid of dead skin cells helps to provide a smooth canvas for the tanning product and ensures the product applies evenly and soaks into the skin without leaving any streaks. You can exfoliate with a great pre-tan body exfoliator or an exfoliating mitt – the choice is yours.
2. Use circular motions
The way you apply is key. For the best results, apply your tanning product in a circular motion. This will help to prevent streaking and give you a more natural-looking glow. You don’t need to rub it in too much, either — the actives in the product will naturally absorb on contact, and you should get an even all-over tan with no issues.
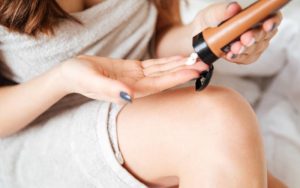
3. Don’t forget the creases
This is another common mistake most people make when applying self-tanner at home — they forget about the creases. Dry areas, like the elbows and knees, need to be treated before application to prevent product over-tanning the creases. Apply moisturiser to these areas before applying your tanner and allow to absorb for at least an hour before tanning. Once you’ve applied your tanner don’t forget to wipe knuckles, knees, and the back of the hands lightly with a damp washcloth to ensure the most natural-looking tan. The skin on these areas is drier and can result in a darker fade if you don’t dab them after.
4. Apply evenly
To protect your hands, and to achieve an even look, use a tanning mitt to ensure the product distributes evenly on the skin. Always start on the face first, taking the product down and then blend. Arms, chest and legs follow but save the feet and hands for last. You want as little product on the mitt as possible for the most realistic results.
5. No mitt, no problem
If you don’t have a tanning mitt, a large makeup brush will do the job too! Even a soft sponge is better than your bare hands. Never mind the fact that you’ll have tanned palms, but you’re also more likely to cause streaks when using your bare hands to apply the product.

Preserve your self-tan at home
Once you’ve got the perfect tan, make sure you maintain it by avoiding shaving and waxing and moisturising twice daily. Avoid shower gels or moisturisers that contain essential oils, as these oils can strip the tan, reducing the length of time you get out of it. For an extra tan-boost, a lotion with a gradual build tan effect is a great option to top up your colour after a few days.
Find the best prices on self-tan essentials online with PriceCheck now:


